Big L Template Signs Procedure Page
A guide for a procedure by which two-color signs can be produced that use the Big L template

Equipment List
·22 inch stretcher panels
·Screen Printing screen (plastic monofilament weave, not silk)
·Chemicals: Emulsion, sensitizer, remover
·Screen filler or nail polish to fill holes with in problem parts of cured screen
·Needle to force holes in problem parts of cured screen
·Heavy duty staple gun (T-50 or similar recommended) and staples
·Squeegee
·Transparencies for signs (this may need a procedure page or tutorial of its own)
·Spacer (posterboard or card stock cut to separate 2.75 inches vertical and horizontal)
·Crystal clear adhesive tape
·Black electrical tape, preferably 1 inch wide or wider if such can be found
·500 Watt halogen lamp or similar light source
·Water hose, air compressor with splay attachment, or equivalent
·Screen printing ink -- dark blue and dark red recommended
·Foam Brushes
·Whatever I forgot to list here. This page is still a work in progress.
Prepare the screen

Snap together the 22 inch stretcher panels into a square frame.

Tightly and evenly staple the mesh to the screen. Use staples
instead of brads or nails -- staples can be removed in the future
without damaging the frame or screen.
Apply sensitized emulsion to the screen and scrape off excess with a
squeegee. Try to keep it even and minimize any visible holes.
Allow to dry for a couple of hours.

After it's dry, use a spacer to clarify 2 and 3/4 inches away from the outside edge
of the frame (some preexisting transparencies may need a horizontal
adjustment from this).

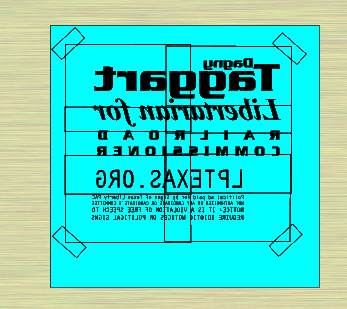
Tape the transparency to the outside of the screen -- horizontally
flipped -- using crystal clear transparent tape (translucent "magic"
tape may not be as good).

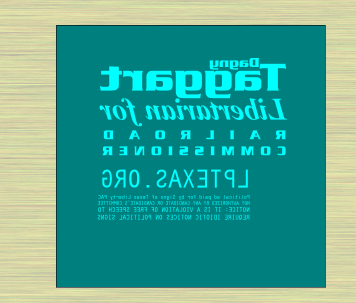
Expose to a halogen lamp until the
exposed sensitized
emulsion turns darker and green. IMPORTANT: ensure that light does not
backscatter and expose the rest of it as well! Carefully remove
tape and transparency. Store transparency for possible future use
(such as if something goes irreparably wrong or a screen is ruined and
a replacement is needed).

Wash off the underexposed emulsion. How much pressure or
abrasiveness we can get away with using may require some
experimentation. A superseded Speedball emulsion was able to take
a full blast of water spray from an air compressor attachment, while a
water hose attachment on a later occasion and a different emulsion was
able to blast the needed emulsion off of the screen, effectively destroying it.

Inspect the screen for excess emulsion and holes that require
attention. Punch holes with a needle or push-pin as needed when
adequate control with a water spray can't remove the excess.
Some documentation suggests leaving the finished screen to sunlight or
halogen light to further cure it to reduce risk of future damage.
Allow screen to completely dry. Fill in holes with a filler.



When finally dry, apply black electrical tape or a suitable inkproofing
substitute to the outer edges of the frame. The front of the
screen that will be contacting the sign blanks is what counts -- tape
as needed to secure the tape on the others side to the wood frame.
Using the screen
With standardized positioning, the locations relative to the sign
blanks should be consistent across messages. Place the sign blank
in its indicated position and the message or template screen in its
indicated position. In this example, the template image was
applied previously, and the message for Dagney Taggart for Railroad
Commissioner is being applied.
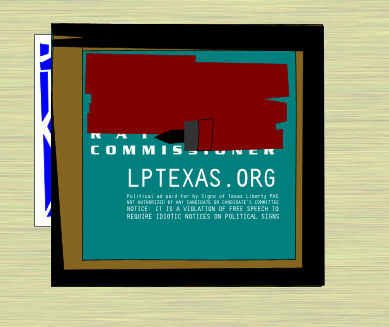
With an inked foam brush, spread a thin layer of ink either
right-to-left or left-to-right. Avoid alternating directions
while inking the same screen blank. Try to cover all portions,
especially the notices required by statutes, but do not apply the ink
with excessive thickness.
Quickly remove the screen from the blank. The screen will be
sticking to the sign blank, so be careful to cleanly separate
them. Hand the sign to someone who can place it in a drying space
location or place it in a safe location in arm's reach to be placed in
its drying location after you run out of such locations in arm's reach
and have several signs to relocate. Avoid changing mental
gears. It's time to start the next sign.

Check that there isn't ink on the wrong side of the screen and remove
any stray amounts with a paper towel or if that won't work, a damp
paper towel, then try the area thoroughly before resuming. If it
becomes necessary to wash the entire screen, you are finished using
that screen for the day. Have additional dry screens you can use
when this happens. Position next sign blank or template place
the screen, and ink the next sign. Repeat as appropriate or until
screen needs to be cleaned, in which case move on to the next screen.
Don't List
Been here; Done this; Let's not do it again...
Use too much ink or thinner ink to reduce the pinstriping effect
Ink will instead run through the recessed lines and produce an unusable sign
Print using a squeegee
Ink will likely run through the recessed lines if you can't do it in one swipe -- and you probably can't.
Spend extra time to ensure the sign is printed correctly
Ink will run through the recessed lines this way too. It loves to do this -- don't give it the chance.
Forget rinsing off that screen
The ink will cure and render the screen permanently unusable
Lean the screen against a wall while exposing it
The light will backscatter curing everything, leaving the screen unusable
Use a spraybottle to remove excess emulsion after curing
The human hand wasn't built for the punishment this procedure dishes out